In earlier posts, we provided information on how to enable public access to ArcGIS Online premium content such as routing and traffic maps and other live feeds. This workflow for sharing works well with most ArcGIS Online premium content (such as Landsat 8 and NAIP imagery, various landscape analysis layers, and historical maps), but it is not a solution for our demographic maps, which have all of the map rendering properties built into the map layers and not the underlying services. However, there is now a workflow available that will let you include demographic map layers in your public maps and apps!
Perhaps you would like to include a demographic map layer as part of a map that you publish on your public facing website, without requiring the end users of the map to have their own ArcGIS account. You can create a map that references the demographic map layer using your ArcGIS account. Keep in mind that demographic maps do consume credits so your account will consume credits for the maps that are requested. However, the credit cost of using these maps is small so you can support thousands of map requests for only a few dollars in credit fees. Below is an example of a demographic map that is set up for public access on a website, this blog.
Median Household Income in the Washington, DC Area
[iframe width=”800″ height=”500″ frameborder=”0″ scrolling=”no” marginheight=”0″ marginwidth=”0″ src=”http://esri.maps.arcgis.com/apps/Embed/index.html?webmap=2825c76f96164ccfb6f1b204dbe7ef27&extent=-77.2068,38.783,-76.8271,38.9975&scale=true&legend=true&theme=light”][/iframe]
Let’s review how this map was created and shared. There are four main steps to create and share demographic maps with the public.
- Create a map layer with your stored credentials and share with everyone
- Create a web map using a demographic map layer that you can update
- Update the URL for the demographic map layer to use URL for your layer and share map with everyone
- Use the web map in your website or application
Sounds simple, right? Well, there is a bit more involved so let’s go through the details for each step.
1. Create a map layer with your stored credentials and share with everyone
You will first need to create a new map layer with your stored credentials and share with everyone. Here are the specific steps:
- Sign in to ArcGIS Online with your organizational subscription account.
- Go to My Content | select Add Item | then item is From the web.
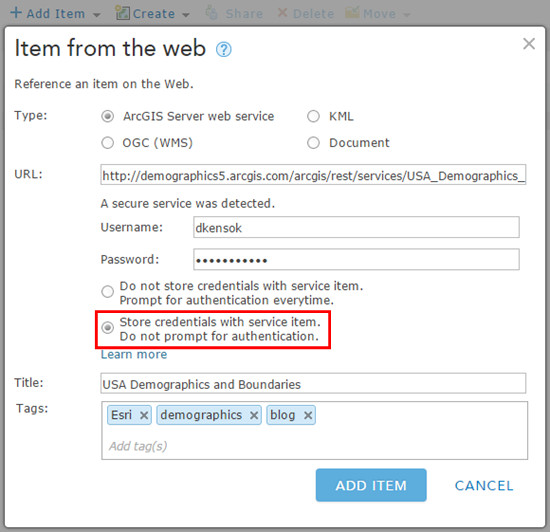
- Copy and paste in the map service URL for the layer to be shared in the URL field. For example, for the USA Median Household Income layer featured above (and many other 2015 map layers), the map service URL is: http://demographics5.arcgis.com/arcgis/rest/services/USA_Demographics_and_Boundaries_2015/MapServer. (You can copy just the URL up to “…/MapServer” part, as shown below.) You can find the URLs in the item descriptions of layers within the Demographics and Lifestyle group.

- After entering the URL, you should be prompted with a Username and Password login because a secure service is detected. Enter the username and password of your org subscription account and select the Store credentials with service item option (see below). Edit item title and tags, and click Add Item. The new Map Image Layer item should show a URL in Map Contents like “http://utility.arcgis.com/usrsvcs/servers/…”, which you will use later in Step 3.
- For the new Map Image Layer item created, click the Share button and share with Everyone. Now you have an entry for this service in your organization that can be added to any map and shared publicly.
- Important Note: You can restrict usage of this new layer if you’d like, which is recommended since usage of demographic maps will consume some credits. On the item details page for the layer, go to Advanced Options | Limit Usage and you can restrict usage based on rate limit or referrer URL. For example, you can limit the usage to only come from a particular website. For the sample map above, I limited usage to be only from my organizational subscription website, which I will use later in Step 4 to embed the map. I’d recommend adding a referrer URL later in the process after you have confirmed the public map is working well and finalized how it will be shared.

2. Create a web map using a demographic map layer that you can update
The next step is to create a web map using the demographic map layer you want to feature and then make a copy that you can update later.
- Go to Map | zoom to area of interest | select Add | select Browse Esri Map Layers | in Categories menu, select Demographics & Lifestyle | and click selected thumbnail to Add layer to map.
- You now need to make a copy of the demographic map layer so you have a new layer in your map that you can update later. Click the down arrow next to the layer and select Copy.
- You can now remove the original demographic map layer (click down arrow again and click Remove) and rename the copied layer still in the map (click down arrow and Rename | update name and click OK).
- Update the map extent and basemap as desired | click Save and enter requested info to Save Map.
3. Update the URL for the demographic map layer to use URL for your layer and share map with everyone
You now have the web map that you want to share with the public but you need to update the Map Service URL for the demographic map layer to use the URL for the Map Image Layer with your stored credentials that you created in Step 1. To do this, there are a couple different tools you can use, such as the ArcGIS Online Assistant app, which I will use here.
- Open new tab in browser, open the ArcGIS Online Assistant app (https://ago-assistant.esri.com/), and click Login to get started.
- The ArcGIS Online Assistant app will request permission to access your account info. If okay, click Approve and the app will sign in to your ArcGIS account.
- In the I want to … menu at the top (see below), select Update the URLs of Services in a Web Map, and click the name of the folder that includes the web map to update (in my example, Demo).
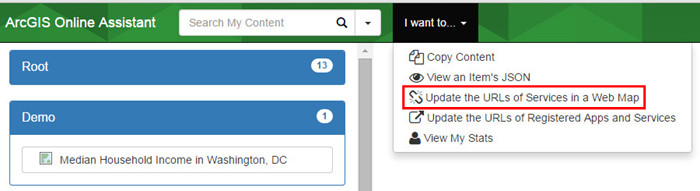
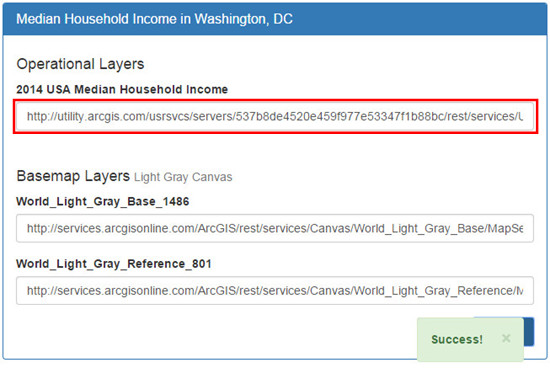
- Click the name of the web map to update (in my example Median Household Income in Washington, DC) and you will see a list of its contents. You will want to update the URL for the demographic map layer in the Operational Layers section. Copy and paste the URL for your new Map Image Layer with stored credentials in the URL field, and click Update.
- After update, you should see a “Success!” message.
- Go back to your web map item description and refresh the page. You should see that the URL for the demographic map layer is updated. Open the web map to verify it is working properly.
- If the map looks good, click the Share button and share the map with Everyone.
- To verify the map is working publicly and anonymously, copy and paste the URL into a new browser tab, edit beginning of URL in browser to replace “<org>.maps.arcgis.com/” with “www.arcgis.com/” and refresh the page. You should still see the demographic map layer display as expected. You can close this tab to return to the map in your organization site.
4. Use the web map in your website or application
The last step is to use the web map you just created in an application or simply embed it in a website. Applications like the Public Information or Basic Viewer configurable app can be shared publicly with the web map you just created since the credentials are embedded in the web map.
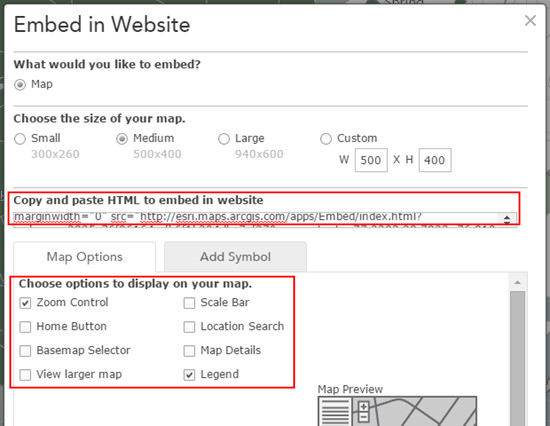
- To share the web map, open the web map in the Map Viewer using your ArcGIS account, and click the Share button on the toolbar. You can click the Embed in Website or Make a Web Application button and follow the standard steps for sharing.
- Use the Embed in Website option to embed the map in a website like this blog. Use the configuration options to customize the map display and then copy and paste the HTML into your website.
I hope this information helps you take fuller advantage of the premium demographic map layers that are available to you with your ArcGIS Online subscription. You can also use this workflow to publicly share several other premium content layers (such as World Traffic or Current Wind and Weather Conditions) where you want to preserve the map rendering and pop-ups configured in the map layers published by Esri. You can discover these layers in the Esri Map Layers group; look for the Premium Content icon.

Commenting is not enabled for this article.